As I mentioned yesterday, I recently bought a set of Calamityware dishes. Calamityware looks like traditional willow ware, but each design includes things that are odd and/or calamitous, like robots, aliens, black holes, sea monsters, etc. I like it because it’s funny and a little bit rebellious. Since I’m planning to use the dishes mostly for Thanksgiving, I started looking online for Thanksgiving decorating ideas that would go well with willow blue. I came across some crafty websites with ideas for embroidering napkins. The designs were nice, but too traditional (read: boring).
But then it occurred to me, what if I were to create cross-stitch patterns to match my plates? I liked the idea of adding my own personal touch. Anybody can shop. Anybody with money can buy things. I don’t want to be just anybody.
I wasn’t sure I could pull it off, but I decided to give it a try. I took a photo of one of the plates, isolated one of the design elements and gridded it to use as a guide. I bought blue and white embroidery floss and a small embroidery hoop. I researched how to cross-stitch onto a fabric that doesn’t have easily counted threads. I found a technique that I thought might work, and I applied it to a cloth napkin that I happened to have lying around. Here is the result:
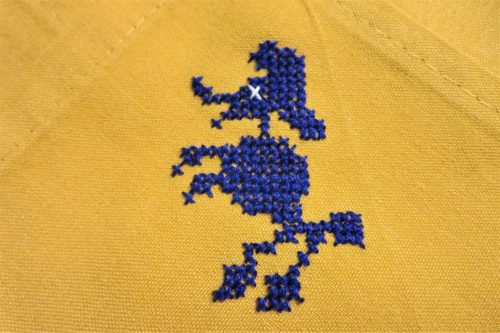
(based on a Calamityware design)
Silly me, I accidentally stitched the zombie poodle upside-down (its head is near the corner, but it ought to be the other way around), and the back of the piece (not shown) is a mess. I definitely need to practice. But I only stitched it as a proof of concept, and I wasn’t expecting it to look nearly as good as it does. Even my husband is impressed.
Steps For Finishing This Project:
- Pick a material for the napkins. The options are linen, cotton, linen-cotton blend, cotton-polyester blend, and polyester. There are a lot of factors (look and feel, absorbency, durability, price, ease of care, etc.). The only thing I’m certain of is that I don’t want 100% polyester. I will need to buy quite a few napkins, so it’s a big decision.
- Pick a color for the napkins. I’m leaning toward white, but my husband is leaning toward blue. The only thing I’m certain of is that we won’t pick mustard yellow (that’s the color of my practice napkin, and it happens to be one of my least favorite colors).
- Maybe buy a different white embroidery floss. I probably won’t need a lot of white (the zombie poodle design has just that one large white X), but the floss I bought turned out to be polyester, and it’s unpleasant to work with.
- Test the color-fastness of the blue floss. It’s probably fine, but better safe than sorry. I might run the napkin through a regular wash and dry to see how well it takes that treatment.
- Practice! I had some problems with keeping my stitches even, anchoring the thread ends, and avoiding knots in the floss. I also managed to get my threads caught on the hoop-tightening mechanism several times. The back of a cross-stitch design is usually not an issue, but it will be for this project, because napkins get flipped over, and the stitches must be secured properly because napkins also get washed. I know perfection is unattainable, but there’s plenty of room for improvement.
- Create more designs. I randomly picked the zombie poodle, and I think it’s awesome, but I don’t want all of the napkins to have zombie poodles on them. I want to have at least a few more designs, if not one for each plate.
My deadline is Thanksgiving. That seems like a long way away, but already January is over, and I’m in shock, as I always am, to see February come so quickly. I’d better hustle!
I love this plan and your “muslin” test.